Thursday, February 20, 2014

Samples - Olympus E-PL2

Just getting the chance to barely scratch the surface, but got a few snaps in today in spots.  


Wednesday, February 19, 2014

The Whirlwind Infatuation

Sometimes, things move glacially...

...and other times, they move with almost blinding speed.  It seems strange to think of how rapidly my perspective has changed in the past 24 hours.

Just four days ago, I posted an article in reference to sensor sizes, and spent much of it referring to enthusiast compact cameras, and to a lesser degree, SLR's.  In the article, I posted links to a number of competing compact cameras that I thought were pretty suitable for transit photography.  

I made one tiny side-step reference of a single paragraph to an emerging format called Micro 4/3's but simultaneously expressed some dismissal of the format as being cost prohibitive compared to larger sensor compacts and DSLR's.  

Tonight, I eat those words with a well seasoned helping of crow.  

I am now a Micro 4/3's Camera Owner, and proud of it.

Yes, I'm a mixed bag of contradictions and reversals.  Perhaps it's a Libra thing. More fittingly, and more likely, it's a cost thing.

The Sony RX-100 was growing on me. The fast lens and the large sensor just seemed perfect, but at the same time, I was a bit less enamored at paying upwards of $600 for Sony's toy.  As I browsed the internet last night, a bored little voice in my head sent me looking at Craigslist, and that's when I saw it in the Photo-Video section - my next camera.  

I am now the owner of an Olympus PEN E-PL2, a 2011 model camera that sports a 1.33" inch sensor, and comes with a 14-42mm lens that should cover most situations.  The lens is interchangeable, so I may add a fast "prime" lens as well as an extended zoom.  

Considering the camera was $125 compared to over $500 for a new one, it was a complete no-brainer.  Reading reviews, there are many others who are developing a fondness with this new format, though I don't know if any adopted it quite as quickly as myself.  

I will be sure to try to give this nice, svelte camera a run through its paces tomorrow and report back.  Curious to see how this infatuation proceeds.   

Meanwhile, keep that crow warm for me! 


Tuesday, February 18, 2014

Using HDR Tools to Salvage a Mediocre Shot

It was my last afternoon in Los Angeles...

Headed back to the hotel after a day out, the plan was to grab my bags from the hotel and head back to the Union Station to catch the Southwest Chief. But on the bus ride back towards  Pershing Square, I saw it, the Queen Mother of iconic Los Angeles transit shots - perfectly lit, bathing in Southern California sunshine.  I knew I had to get a photo of it! 

In hindsight, I don't know why I didn't bail out then and there to get the shot.  Perhaps I had already mentally committed to my destination.  Instead, I elected to proceed as scheduled, but make an intermediate stop on the trip back to the train station.  Big mistake.

By the time I arrived back at Spring and 1st Streets, the enchanting sunlit shot opportunity was now just a memory.  The once fully illuminated buses running along Spring Street were now cloaked in a canyon of shadow, yet the L.A. City Hall was still glowing with reflected sunshine.  Feeling irritated and defeated, I snapped off a few mediocre shots of what I could manage in the terribly lit scene, before trundling over to get the train out of town. 


Coincidentally, around this time, I had begun dabbling with HDR Photography Imaging (a topic of a future post) and had downloaded a software product that did HDR imaging.  With nothing to be lost, I decided to try a novel experiment.

A typical HDR image is composed from three to five bracketed photo exposures.  The process involves something to the degree of pulling details out (from the overexposed shots) in what would typically be lost in a normal exposure, and combining it with the tonal range (from the underexposed shots) that would typically be blown out in a normal exposure, and creating a single exposure that retains the colors of the original scene and still has the details of the shadowed areas.  

However, when all one has is a single shot to work with, it is not possible to combine exposures, or is it?  

The fun of modern technology.  Using something as simple as Google's Picasa software, I elected to save two alternative versions of the photo, one of which had the "fill light" in the shadowed portion significantly bumped up to emulate an "overexposure" and the other with the "shadows" brought out to create a dark photo with some rich photo tones. 

I then loaded the three images in the HDR software and combined them to create a new image, that, while hardly the sun drenched image I had initially hoped to capture at this intersection, was at least a lot more bearable than the original.   At some point, I will have to return to get the initial photo I had wanted, but for now this will do.  


Monday, February 17, 2014

Fish Out of Water

Point for Pondering:

When you think of your typical transit photography setting, what first comes to mind?

It could very well be a fully packed transit bus rambling down a broad thoroughfare amid a densely populated neighborhood, or dropping off people in a cluttered commercial area.  It may be a light rail train zipping along heavily graded right of way between stations, or it may be a subway train stopping at a bustling transfer interchange point.  Keep those thoughts, please.

For decades, mass transit's primary domain has been moving, well, the masses.  Its areas of primary success have been those with large and dense populations of potential customers of modest means.  When it comes to buses, due to the size of the vehicles, the noise they create, and the general wishes of neighborhood residents due to these factors, they typically are restrained to mainline arteries.  Key word: TYPICALLY.

For many years, I've had a peculiar fascination with the outliers to the the above premise, and have made some effort to try to document these as much as I could.  These may have included something as simple as particularly narrow city streets that buses traversed to connect between major arteries, bus service on narrow residential roadways in well-to-do areas, or transit service of any mode in an area that looks like it doesn't have ANY density to be able to support it!  

Depending on where you live, the availability of these "fish out of water" situations will obviously vary.  In my general area in the mid-Atlantic, such interesting locational opportunities, while never all that prevalent to begin with, have been in an increasing state of decline.  The general tendency in most transit agencies is to streamline service, with the focus being increasingly on core service pattern with minimal deviation.  As such, one may have to do some particular scanning of the local service information maps and timetables, while perusing Google Street View to scout out possibilities of this sort.  

Why tell this story?

One might rightfully be able to argue that since these situations are atypical of most transit operations, their importance should not be artificially inflated.  Fair enough indeed, but I'd counter by saying that any story worth telling is worth telling completely.  Besides, some of these unusual settings can serve as illustrated examples of the diversity and versatility possible with transit service, even if these outliers may be far from perfect. 

Examples:

For the history buffs, the best example of outliers are that of service running on narrow arteries in dense environments in the "Olde City." Service running on belgian block or brick paved streets is a bonus!  Composition of such shots can be pretty challenging due to parked cars and other obstructions, and may be best accomplished through a largely head-on perspective.  

The following shot doesn't quite successfully illustrate the narrowness of Hughes Street on which the #1 runs, due to my interest in positioning the street paving in the foreground, but definitely makes me feel like I should make a return trip for another try! 


Moving outward from the city core, another example shows a full size transit bus traversing a particularly narrow residential street in a moderate density, working class neighborhood:


From the 1940's until 2008, interesting shots such as this were possible in Baltimore on the #11 line, which ran along narrow residential streets in a quaint well-to-do neighborhood, directly past ponds with fountains.  Service was then entirely relocated to the nearest main artery.  


The following shot doesn't readily illustrate the affluence of the area in which it is operating, though it does give a look far removed from the typical transit environment.  I am glad I took the time and effort to get this photo, as service stopped running here in 2005.


And definitely far-removed from the usual urban environs is this shot taken around 2001, in one of the most far-flung parts of the service area.  Standing out street-side awaiting this shot to happen definitely turned some heads from the passing motorists.  As with the last couple shots, this shot is no longer possible due to service cutbacks.


Though shots like this are admittedly more of a bus phenomenon than a rail one, there are some current examples in our nation's limited rail infrastructure in which both street-running rail systems, and those on private right-of-ways can be spotted in some atypical settings.  The following shot shows an extension of the #13 trolley in Philadelphia that winds its way through some narrow residential streets in the Darby area.  Though  too wedge like in nature to really illustrative (thanks to me rushing the shot), it does give just one example of a rail operation with a unique operating nature.  To be said, there are a number of others. 


To close, I would like to merely say the following, without sounding alarmist.  Never take for granted that the shot you may wish to take today will exist tomorrow.  You'll note that three of the six examples shown above are no longer possible to capture, aside from chartering a bus and "posing" them.  Outliers like those above a neat, and rewarding way to add a novel amount of variety to your photo collection, and they will certainly be ones that you will look back upon with a feeling of both interest and accomplishment! 


Sunday, February 16, 2014

The WORST Transit Photo EVER!

Cleveland, OH - October 6, 2006:


It happens to the best of us.  What seemed like a passable shot at first glance turned to this when the shutter button was pressed.  After this miserable shot, I had nowhere to go but up! This was my mistake by the Lake! 


Saturday, February 15, 2014

Sensors: Size Matters

It's true: Size Matters.

Ok, I said it. Though I can also say it also obviously matters what you do with it.  

The digital photography revolution has seen a myriad of trends already in just a decade and a half, particularly in the compact market segment.  In the latter part of the aughts, there was a frivolous "Megapixel War" which saw typical camera specs balloon from 3MP to 12MP in just a few short years. While that has generally subsided, there remains an ongoing "Megazoom War" with bridge cameras capable of up to 50X Zoom levels.   Add in a host of other sexy features such as scene modes, sweep panorama shots, and Wi-Fi connectivity, and you have the making of a marketer's wet dream.

But when it all comes down to it, there is one factor more likely than any of the aggressively promoted items above that is likely to have the most impact on the image quality of the photos you shoot: sensor size.

For a number of years, this aspect of digital photography was all but overlooked as manufacturers focused their attention on scintillating specs such as Megapixels and Zoom range.  Even worse, to keep the costs of these seductive beasts at an attractive level, the consumer cameras of 2006-2009 typically had SMALLER sensors (1/1.8 on earlier models to 1/2.3 on later models) than their predecessors of just a few years prior.  They claimed the newer sensors were better as they did more to eliminate light noise.  Harrumph! 

If we think back to the film era, larger formats always allowed the potential for far more image detail.  While it was *possible* to take a better image with a 110 film SLR than with a cheap 35mm consumer camera, the same 110 camera could not complete with a 35mm camera of similar quality.  Meanwhile, the 35mm cameras covered only a fraction of the space covered by medium and large film formats

During the nadir of the High pixel count wars, there were a few compact camera models in particular, such as the Panasonic LX-3 and the Canon G-series line, that managed to keep some sanity in the compact camera mix by retaining 1/1.63 to 1/1.8 sensors. However, the price tags of these cameras combined with their limited zoom found them being overlooked by transit photographers who were wowed by the more affordable cameras with the more robust zoom lenses and smaller sensors. 

Digital SLR's: Not so standard

Interestingly, unlike their film based predecessors that pretty much took images of the same 24x36 size, digital SLR's are actually broken down into two flavors, full frame versions (that run on the pricey side) and "Crop" cameras that use an APS-C size sensor that is significantly larger than compact sensors, but still measurably smaller than the full frame cameras.  The result is that photos taken with these cameras have a multiplication factor involved that results in focal lengths of lenses that are longer than stated, so that a 50mm lens on an Crop camera behaves more like an 80mm.

Curious Aside:  The name "APS-C" is actually ironic.  In the mid-1990's, before the advent of the Digital era, camera and film manufacturers attempted to reinvent film photography by inventing a new format called APS (Advanced Photo System) that promised the ability to readily switch between Classic and Panoramic formats as well as easier film loading, and better information exchange between camera and film roll.  The system was only struggling to get off the ground by the time the digital era came along and delivered the final death knell.

To make things even more complicated, an interchangeable lens format called Micro 4/3s has been released with a 1 1/3" sensor, smaller than the APS-C but larger than nearly all compacts.  The advantages touted of cameras using these sensors is that they are much more compact in nature than SLR's but with better image quality than compacts.  As a result, cameras using this technology, such as the Olympus PEN EP-1 tend to have a niche market among camera enthusiasts and a hefty pricetag to go along with it.

Meanwhile, in the Compact Market  

Despite the attention to the Micro 4/3's product development, there remain new releases in the compact camera market that embody the legacy of cameras like the LX-3 by touting larger more capable sensors coupled with fast lenses:


There is variety to sensor types as well, but that may be for another article.  In any event, following this link to the visual diagram attached to this article may help make a little more sense to the widely disparate sizes in sensors among SLR and compact cameras.  It definitely helps to read reviews and compare features prior to purchasing a new camera to get the most bang for your buck.  


Friday, February 14, 2014

The Equipment Bag

A Confession

My SLR is not my primary camera.  

There.  I said it.  I'll let it sink in for a minute before trying to explain why - if I can.

I can readily admit that is does seem a bit hypocritical of me to not always be carrying my best possible equipment with me at all times, after I just made a post praising the late Edward S. Miller, particularly for investing in a high end Leica camera with which to take such phenomenal photos.  

I can try to "blame" the heft of my DSLR as the reason for this, as I certainly could not see myself lugging my Canon with me on a daily basis on the rather marginal chance that I should happen to spot a "must have" photo on my commute.   That aside, there have been times when I specifically went out for the purposes of transit photography and used a compact camera instead of it, and still other times when I went out for transit photography and did not even bring my Digital SLR.  

Heresy.

What had happened was...

In all honesty, there have been a number of occasions when my digital SLR would not be able to get the shot my Compact camera would.  Seriously.  No really, I'm saying this with a straight face. 

My SLR is a Canon EOS Digital XTI, which is a particularly competent camera, though it does have its limitations.  The most telling limitation is that it is not a "full frame" SLR, but rather what is typically called a "crop camera" in that the sensor does not fully cover the lens rating, leading to about a 50% increase in focal length.  A 50mm lens on this camera acts more like an 80mm lens.  For zoomed in shots, this can be admittedly pretty great.  If I put on my 70-210mm lens and zoom it out, it's pulls in and compresses distant details to create a nicely detailed composition when taking photos with skyline backdrops.


However, when taking photos with a wider field of view, it can be admittedly a bit limiting.  I only have three lenses for this camera: the "prime" 50mm/f1.7, the 70-210mm/f3.5-4.5, and the 28-80mm/f3.5-5.6.  As a result, the "widest" I can go is to about a 45mm equivalent.  There have been times when in the midst of composing a photo in a Downtown area, I am unable to get a prominent building on the skyline within the frame, requiring me to either reconsider the composition, or attempt to back up by as much as a half a block to fit the desired backdrop within the frame.  Meanwhile, my compact cameras can back up to about a 28mm equivalent. 


Impossible with the SLR

The Rundown:

Naturally, I haven't sampled the full variety of digital cameras available, but I've managed to use a pretty good variety of models nonetheless.  Here is a sequential progression of the digital cameras I have toted around with me over the years, with a sample of its output, as well as some general thoughts.


My first digital camera was acquired second hand from a friend in early 2001, and I kept it for about 6 months before replacing it.  It was able to get you a quick digital photo in ideal light pretty readily, but it was hardly comparable to film, with a modest 1.5MP range.


Acquired in July of 2001, this 3 MP camera was leaps and bounds ahead of the Fuji, with a fast f/2.0 3X Optical Zoom and some really great color rendition and features.  It was my daily tagalong for years, when I finally supplanted it with another camera in 2005.  Even then, I still carried along for a while, before regrettably leaving it on a bus one day.  


Lured by the sexiness of 10X Zoom and 640x480 video, I bit for this camera in February of 2005.  I found myself taking more video and fewer stills however, as I never quite felt this camera had quite the pleasing image results as the old Casio.  Still, I kept this 3MP Bridge camera until it quit on its own in about 2009.  


Generally not too impressed with the stills on the S-1 IS, and wanting improved video, I went in on the Z-1275 in September of 2007, which promised Schneider Optics, a 12MP resolution, and 720p video.  Sadly, the features were all fluff, with the video lacking image stabilization, and the image quality being pretty lackluster in stills.


Admittedly bought (in Febraury of 2009) to function almost entirely as a discreet video camera for transit photography with its 720p Stereo Image Stabilized video, the Sony performed great in that role, though its rare use as a photography camera was limited in features and with output even worse than the Kodak.


Increasing frustration in finding a compact digital camera that didn't use a small sensor while it played the Megapixel race, but which wasn't as expensive as the unique and niche Panasonic LX-3 led me to look on Ebay in the Spring of 2009 to find the successor to my beloved QV-3000, the 4000 model that was released back in 2001.   It didn't disappoint either, as it began to make transit photography fun once again.  


Finally in the Summer of 2009, I could no longer hold out.  The "new" Casio had reawakened my interest in photography, but I could see where its image quality was pretty dated.  If I really wanted a highly detailed image, I would have to pony up the money for a digital SLR. After doing some research, I finally decided upon this model and managed to find one at a reasonable price, used on Craigslist.  The camera has proven to be a capable performer, though I admit it is not quite as fun or intuitive to use as the Casio models.  After all, ease of use is apparently not its main penchant.    


But I didn't stop there.  There were (and continue to be) some limitations with using the SLR, most notably the focal length on the wider end, but also the lens speed.  While the Canon works well until ISO400, the zoom lenses only stop down to f/3.5 at best, leaving twilight and night shots to be pretty futile.  Similarly, color rendition on the Canon could be really flat in certain conditions, requiring a lot of post processing.  When I spotted a new Samsung camera in early 2011 that used a larger sensor than most compacts while sporting an F/1.7 lens, I elected to pull the trigger.

The TL-500 has pretty much become my tagalong camera on the daily commute, due to its compact size, light weight, and robust performance.  It is by no means a substitute for my digital SLR, but it can be quickly used in situations where my SLR would struggle. Interestingly however, while I have had this camera for nearly 3 years, I have yet to take it out on its own specifically for a transit shoot the way I would have readily done without question with the Casio cameras.  

Perhaps I just don't feel the same level of comfort with this camera.  I'm not sure if it is more to do with a lack of confidence in it being able to handle all the situations I might encounter, or if it has more to do with me simply having the knowledge that I have the SLR now.  

That's my story and I'm sticking to it. 

Looking ahead, I'm not sure what my next equipment move might be.  I have perused everything from a large-sensored, fast camera like the Sony RX-100 to the ultrafast successor to my TL-500 in the compact category, but may ultimately take the plunge for a more capable Canon SLR that will allow me to arm myself with two lenses at the ready at the same time.  

Suggestions?  

Thursday, February 13, 2014

Landmarking

I may not typically copyright my photos, but I'm copyrighting the term: Landmarking.

No, this is not referring to what a dog or frat boy does to the newly fallen snow.  It is actually one of the more instantly rewarding methods used in transit photography to create a very memorable image.  Quite simply, it is the deliberate placement of a landmark of some sort into the framing of the image.  

Though it normally requires some degree of pre-planning to best accomplish, it is among the best ways to add local context and story to your transit images.  Even more interestingly, it can be accomplished in numerous ways compositionally.  Let's take a look at some composition methods with landmarks.

Distant:


With this method, the landmark of interest is typically at least a half a mile away in the backdrop.  This method is often used to bring skylines or other massive structures into the frame.  Though a zoom lens can be helpful in compressing the composition and make the distant landmark more prominent, it may not always be necessary.  The photo above was simply taken at a normal focal length.

Nearby:


This composition method works well with landmarks of moderate size and/or height and involves a setup anywhere from a block away to as much as a half a mile, depending partially on sight lines, but also shaped largely by the focal length of the shot.  A wide angle shot and a partial telephoto shot will have significant compositional differences on the background elements. 

Adjacent:


This composition method works well with more modest size landmarks and involves taking an image of the transit vehicle passing directly by the landmark itself. It works well with items like fountains and statues, as seen above, but also with modest size urban movie theaters, diners, or potentially even recognizable natural features such as a community Christmas tree.

Foreground:


Though not too often used, this can actually be one of the more engaging and fun ways to compose photos with a transit context.  In these images, the transit vehicle becomes much more of an incidental in the photograph, as opposed to a cornerstone, but with some creative composition, it doesn't have to be relegated to being unimportant.  This composition method is typically only workable with smaller landmarks such as sidewalk statuary and monuments. 

Combining Landmarking methods:


When working landmarks into your transit images, there is certainly no rule that states that you need to only use a single composition method.  In fact, your photo can tell a great deal more by combining multiple methods onto a single image. The photo above is one of my favorite examples of this, positioning the Baltimore skyline as a distant landmark with the Patterson Theater in a nearby/adjacent position.  The result is an image that offers a significant amount of geographic context.  

Putting these methods into practice:

Landmarking can also be a pretty fun thing to plan for, and this planning can be done in a couple of ways, depending on one's familiarity with the region they are planning to photograph. One might take the timetable map of a line and work their way along it trying to figure out good places to work in landmark type shots.  One can also think specifically of the landmark that they want to work into their shot, and then work outward to research transit lines that can be readily incorporated into the shot.  

In either method, it can also be helpful to consider lighting factors that may be at play as well as traffic conditions that might hinder one's ability to get the desired photo.  Recent tools such as Google Maps and their Streetview Tool can also be quite helpful in doing some homework to offer good starting locations for setting up shop.  However, do keep in mind that Streetview uses a very wide angle lens, which can distort the relation of distant objects. For example, the location in the photo just above looks like this in GSV, leaving one to believe the distant skyline is not even visible. 


View Larger Map

One of the more rewarding things about landmarking is that the frustration factor can be lessened with proper planning and a bit of good luck.  In nearly all cases, landmarks don't move, so they can pre-composed as you await the one mobile item to complete the composition, the transit vehicle.  Now to only hope another mobile item that you don't want to be prominent in your composition doesn't come along and wreck things!  

Wednesday, February 12, 2014

It's Always Sunny in 1952 Baltimore

Honoring Edward S. Miller


I never had the privilege of meeting Edward S. Miller, but in retrospect, I really wish that I had.  

Born in Danville, PA in 1920, Edward S. Miller was a highly regarded railfan and photographer whose photographic masterpieces can be found in numerous publications. After serving in World War II, Mr. Miller returned to the US and operated streetcars for the Capital Transit Company in Washington DC for a number of years.  After moving on from CTC, he would travel rather extensively and capture some of the most unforgettable streetcar and railroad images of the era on his Leica camera he acquired in 1952.  

Mr. Miller was known in particular for being a "location" type photographer, instead of a "roster" (or "wedge") shooter.  His scenes do a phenomenal job of evoking a nostalgic magic that truly shows the feel of an era that was about to decline rapidly.  His work truly shows the achievement of the "sweet spot" between vehicle photography and location photography to create a true "scene" in his images, be they of a bustling street corner, or a bucolic wooded setting tucked away in an obscure setting.

As one excellent article on Mr. Miller aptly states, he "was careful about his compositions. While the trains form the central point of the photographs, he made it a point to get other elements in the picture to set the scene and give it a unique sense of time and place, whether it be a trolley gliding down a palm-tree-lined avenue in Los Angeles or picking up passengers en route to Sans Souci Park in Hanover Township. He loved to get people in the pictures, unusual geographic features, colorful elements such as flower gardens or neon signs."

An online collection of a number of his works, primarily concentrated on Baltimore can be found at this website.  It is certainly worth a leisurely look through the amazing images to get a look at what Baltimore was like in this era.  I almost wonder if they make the Monumental City look too good, given the particularly high ratio of vivid and colorful sunlit exposures! Regardless, there are countless images in this collection that literally make me want to "crawl in the time machine portal" to join Mr. Miller in 1952 Baltimore with a camera in hand to record my own exposures of the scenes that he so amazingly portrayed, though I'm sure mine would be inferior to his.  

Sadly, Mr. Miller passed away in April of 2010 at 90 years of age.  He is kindly remembered for his never ending interest in all things railway related, as well as his generosity in sharing his images to enable future generations like myself to get a window into a world we never knew. He is certainly missed, even among those of us who were never fortunate enough to have met him.      


Tuesday, February 11, 2014

Transit Photography Then and Now

I've been thinking lately.

Pondering actually.  What about?  Why does it seem that a lot of transit images of the past are so much more visually interesting than the majority taken today?

I used to think it was purely nostalgia at play.  The street scenes of the 1940's-1970's were just far more visually interesting than those of today. While this does play a large part, at least from my personal perceptions, it is not the only factor at play.  In fact, the nostalgia factor may not even main factor that tends to make the older photos interesting.  

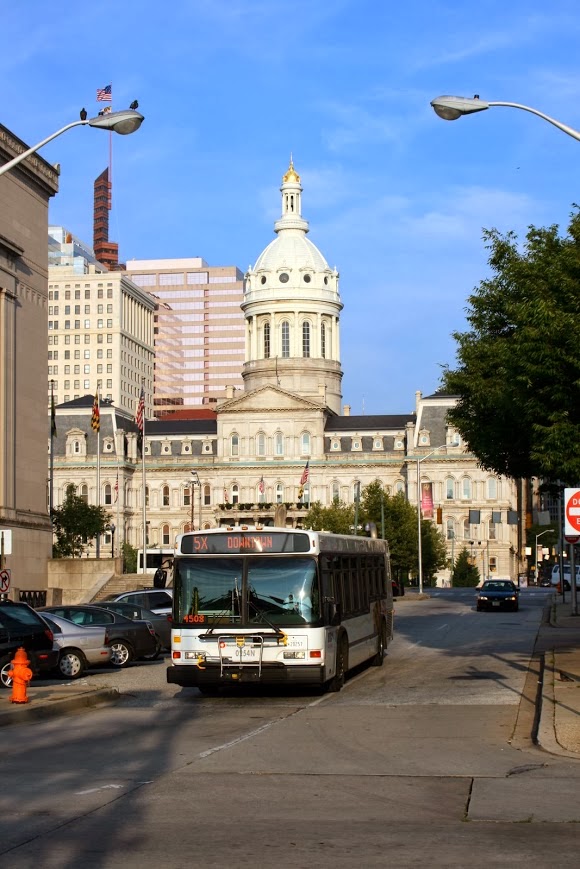
For example, consider these two photos, one taken in 1967, and one taken 43 years later in 2010:


While the photo from 1967 certainly has the nostalgic appeal of the old Brill bus, it offers very little else in the way of visual appeal.  Conversely, the modern photo has a wide range of extras that provide an enormous amount of context to the photo. making it much more interesting to view.

Ok, so?...

That all said, the vintage picture above is fairly atypical of older transit photography.  This all leads me back to my pondering.  

Thinking back to my own "career" in transit photography however, I can begin to make more sense of things.  When I started really getting into transit photography in 1989, my first equipment was not too far advanced over that used in the 1950's.  I had a Minolta X-700 with a standard 50mm manual focus f/1.7 lens.  Digital photography was only in its most embryonic of phases and was not even a consumer product.  

Thinking back, shooting on film with this camera was much different than shooting with the digital cameras of today.  The biggest reason was that, unlike in today's digital world, each exposure made on a camera incurred a noticeable cost.  Not only was there film and processing to account for, but it was not possible (as today) to take a test exposure for viewing.  With these costs, and the technical limitations, you pretty much had one chance to get your shot right, and you paid for every shot.  Given the fixed focal length lens, you also could typically only get but so close to the subject in action.  Despite all this, I was still able to get some good images in these early years.  


By 2000, digital photography was becoming increasingly mainstream.  Still, for all its advantages, the typical cameras of the time were in the 2-3 MP range.  This tended to be problematic for transit photography, as shots taken from the traditional perspectives had significant detail loss over film shots, and compressed jpeg files would look watery, practially turning 3's on fleet numbers into 8's! 

My first decent digital camera was a Casio QV-3000, which, while offering quite a lot in the way of neat features at the time, only had a maximum image resolution of 2048x1536. However, it also offered a zoom lens, and I found myself using it more and more in photography to minimize loss in image detail in vehicles, and as a result, sacrificing external details instead.  


As digital cameras continued to progress, zooms on many models hit extreme lengths, each model progressing in leaps in bounds over the previous year.  Simultaneously, the prices of these ultra-featured models were actually cheaper than models from previous years.  For example: today $280 can buy a Nikon 16MP camera with a 30X zoom (23mm-675mm in 35mm equivalent) that were features entirely unheard of when I paid $400 for my Casio camera over 12 years ago! 

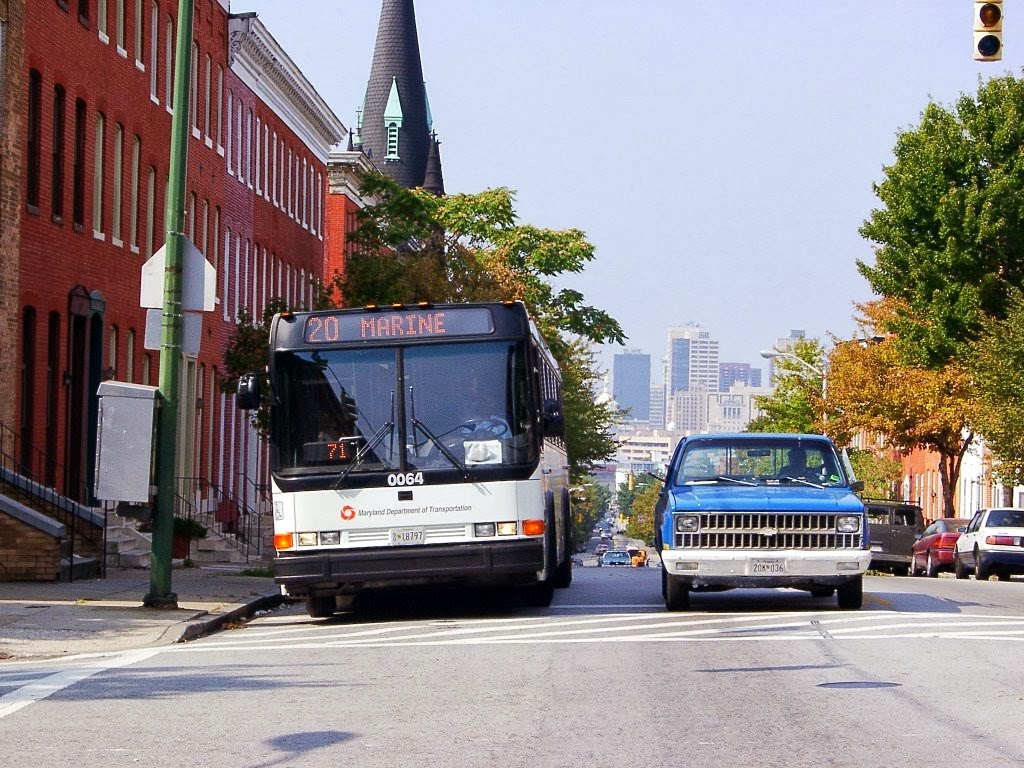
The result is that there are some very affordable cameras available that have zoom features that were impossible years ago.  As such, the temptation to "zoom in" only gets easier to do. For some transit enthusiasts who are only really interested in the vehicle, this can lead to a tendency to habitually wedge shots, leaving the rest of the surrounding scene ignored, while also leading to insomnia from those viewing their shots, who would appreciate a bit more.


Monday, February 10, 2014

Breaking the Wedge - An Example

How about a sample?

Here are two shots taken on the same afternoon a couple of blocks apart.  


The first image is an example of a wedge type shot, but shot from the left.  The second has some wedge qualities, but is dialed much farther back.  

In the first one, the picture tells the following story:  Bus 9930 was being operated on the #3 to Cromwell, block #3167, and was passing a Kia on a fairly narrow street in leafy environs on a sunny day.

The second picture tells the following story:  Charles Street, in the vicinity of the Washington Monument, was enjoying a sunny summer day with some light clouds wisping through the sky.  Moderate traffic, including nearly half a dozen cars of various types were proceeding up the street and about to traverse over some increasingly exposed old trolley rail in the foreground.  Right amid this whole scene was bus #9856, preparing to pull off from the bus stop as it works its way to North Avenue on the #64 line.

Which of the two photos has more to tell, both today, and for future generations?  

Sunday, February 9, 2014

What's the "Wedge?" An Intro.

It all started with a book.  

I was enjoying an afternoon of downtime, and had some time to look through a couple of books specializing in trolley photos from the 1930's to the 1960's.  Both of these books I had scanned completely through many times before, but it had been a couple of years since I'd had the opportunity to scan through them.  I had remembered how captivating the images were, and after the hiatus, I was having one of those sweet opportunities to practically enjoy them anew once again.  

On looking at the photos in these two excellent books: PCC - From Coast to Coast, and Streetcar Scenes of the 1950's in Color, I had something of an epiphany of sorts in relation to so much the transit photography I see being done these days...


Ok, maybe it wasn't quite like that, as I had certainly been doing my best to keep my transit shots to include a wide variety of backdrops.  Still, I could think back and admit to taking trips to other cities and spending excessive time at high volume locations, and coming away with a good quantity of technically sound but otherwise ho-hum photos that oftentimes did not readily embody the feeling of the cities in which they were shot.  

Moreover, I could admit to fighting back yawns when looking at the volumes of present day photos posted around the internet using modern equipment and digital technology, and I could even admit that this rising trend was actually diminishing my enthusiasm for a hobby I'd been involved in for nearly 25 years.

So what's a wedge?

The "wedge" is a term used for a standard composition photo of a transit vehicle, typically taken to show the front of the vehicle and a perspective view of the right (or left) side.  The "perfect wedge" typically involves the vehicle being fully sunlit when possible so as to make a bright and colorful image.  

The typical wedge will have the vehicle occupying at least 50% of the frame.  The prevalence of fast focusing zoom cameras has made it easier to zoom in to where one can fill more than 80% of the frame with the vehicle.  

Given these ratios, the overwhelmingly dominant part of the emphasis in these photos is the vehicle itself.  A "skilled" wedge photographer can create an image that is entirely about the vehicle itself.  

So why break the wedge?

Don't get me wrong; wedges have their place.  They are the best composition to highlight construction details or variances on a transit vehicle, and paint schemes.  However, they are increasingly overused in my opinion.  

A big role of photography is to tell a story.  I have seen some transit photographs tell an amazing amount of story in one scene.  A wedge on the other hand only tells a frustratingly limited tidbit of information.  To paraphrase the old adage, a photo should be worth a thousand words.

I'm starting this blog as a resource specifically tailored to transit photographers willing to collaborate to broaden the spectrum of what can be a very creative and rewarding hobby. Topics will range from technical issues to composition related items to creative aspects that are possible with current technology.  

Feel free to follow and join in the conversation.

Adam Paul